Thank for providing us
with your information
Important Next Steps
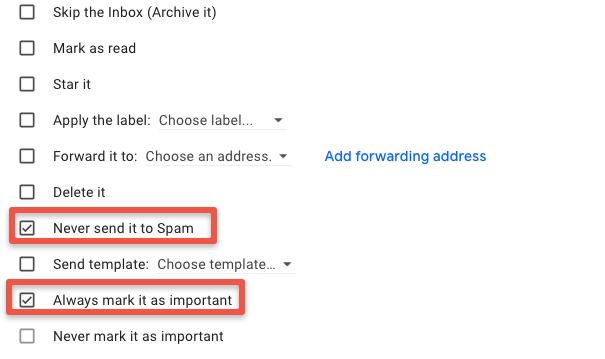
There is a good chance the notification email I send you will get caught up in your spam folder. Similarly, when you use the new Boomtown app, it will also email you alerts that you set. These too may land up in your spam folder and then automatically deleted after 30 days.
Please follow these important steps to ensure you get these important emails.
You can also google: "how to whitelist a domain in [eg. gmail]"
Go to your inbox of the email address you just used to sign up: No provided or unknown
Find the email sent by us.
"From michael@hotspotcentral.com.au".
Whitelist my email address - this is the most important step
Select your email provider below and please follow the simple instructions.
For 2003, 2007 and Express - Without an example email address in your inbox:
- Select Actions from the toolbar at the top of the screen.
- Select Junk E-mail.
- Select Junk E-mail Options...
- Click the Safe Sender tab.
- Click Add.
- Type in the email address you wish to add to your safe sender list.
- Click OK.
For 2003, 2007 and Express - With an example email address in your inbox:
- Open the email.
- In the Toolbar options at the top, click the Safe Lists drop-down.
Note: This is located in the "Junk Email" section - Select "Add sender to Address book".
- Click OK.
- For 2003, 2007 and Express - To white list an entire domain:
- Open the email.
- In the Toolbar options at the top, click the Safe Lists drop-down.
Note: This is located in the "Junk Email" section - Select "Add Sender's Domain (@example.com) to Safe Senders List.
- Click OK.
- For 2010
- In Outlook, go to the Home tab.
- Click the Junk button.
- Choose "Junk E-Mail Options" from the drop-down list.
- Go to the Safe Senders tab.
- Type in either the email address or the domain name you wish to add.
- Click OK.
- For 2013
- In Outlook, go to the Home tab.
- Click Junk > Junk Email Options.
- Select the Safe Senders Tab and click Add.
- In the Add address or domain box, enter the email address or the domain name you want to whitelist.
- Click OK and close the window.
- Express
- In Outlook, go to the Tools menu.
- Select "Address Book".
- Click New and select New Contact from the drop-down menu.
- Type in email address and include any details you want.
- Click OK.
In Yahoo Mail, your Contacts list is your whitelist. To add the From Address to your Yahoo Contacts:
- Open your Yahoo mailbox.
- Click the address book icon under the Yahoo! Mail logo. When you roll your mouse over it, it will say Contacts.
- Click "New Contact".
- Fill in the fields of your Contact.
- Click Save.
- Open the email.
- Ctrl-click the sender's email address and select "Open in Address Book."
- Verify the sender's contact details.
- Click Save.
